Once the basic principles of chromakey are understood, the next practical challenge is lighting the background evenly. A green screen does not need to be brightly illuminated, but it does need to be consistent.
When the background is lit evenly, the key tends to become more stable and predictable. Although this alone cannot guarantee a perfect composite, it greatly improves the likelihood of achieving a clean separation between subject and background. When the lighting varies across the surface, the compositor often has to spend time correcting problems that were created during capture.
For that reason, crews usually treat background illumination as a technical task rather than a creative one.
Why Evenness Matters
A chromakey background works because software can isolate a narrow range of colour values and separate them from the subject.
If the illumination across the screen varies significantly, those colour values begin to shift. Some areas may appear slightly brighter or darker than others, which introduces variation into the green channel.
During compositing, this often appears as:
- patchy edges
• inconsistent matte lines
• additional noise around the subject
The aim, therefore, is not maximum brightness but a smooth and even field of colour.
Typical Exposure Levels
In practical terms, many productions aim for the green screen to sit somewhere around 40 to 50 IRE.
IRE is simply a scale used to describe brightness within a video signal. Black sits at the lower end of the scale and white at the upper end, with intermediate values representing different exposure levels.
In modern workflows, these values are usually observed using monitoring tools built into the camera or an external monitor rather than measured directly with a light meter.
When the background sits within a relatively narrow exposure range, the compositor can isolate it easily, and the key becomes less unstable across the frame.
Subject exposure normally sits somewhat higher than the background. For example, Caucasian skin tones often fall somewhere around 55 to 65 IRE, depending on the lighting style of the scene.
These numbers are not strict rules, but they provide a useful reference when establishing a chromakey setup.
Monitoring Exposure on Set
Several tools can be used to judge exposure when preparing a chromakey background in a studio environment.
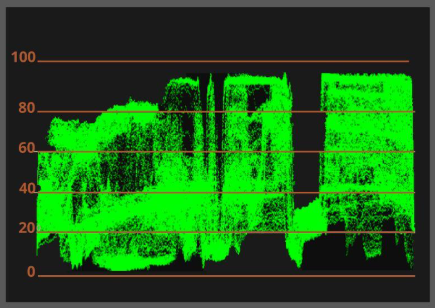
Some cameras and external monitors provide a waveform display which shows brightness values across the frame. When the screen is evenly lit the waveform appears as a relatively flat band.
A waveform monitor presents the range of brightness values across the frame, though it does not indicate where those values occur vertically within the image. If the top of a green screen happens to be brighter than the bottom, the waveform will simply display a thicker band representing both levels.
The operator must still look at the picture to judge precisely where the variation occurs.
Not every camera includes a waveform display. Many crews instead rely on false colour monitoring, which is available on a wide range of cameras and monitors. A traditional light meter may also be used when establishing lighting ratios. However, many operators now rely primarily on the camera’s monitoring tools since they can show at a glance exactly what the sensor is recording.
False Colour Reference Points
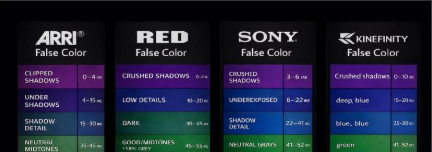
The exact colours used by false colour displays vary between manufacturers, but the principle remains the same. Consistency across the screen is more important than the precise value.
Many operators gradually become familiar with the colour scale used by their preferred camera system.
On some cameras, a correctly exposed green cyc appears within a consistent mid-tone colour band across the background, while skin tones appear within a slightly brighter band.
Some operators use simple visual reference points when working quickly. For example, a correctly exposed green cyc may appear green in the false colour display, while typical skin tones often appear pink. It is not universal, but it is often close enough to orient the operator quickly.
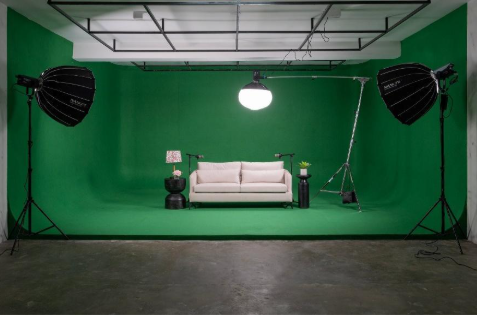
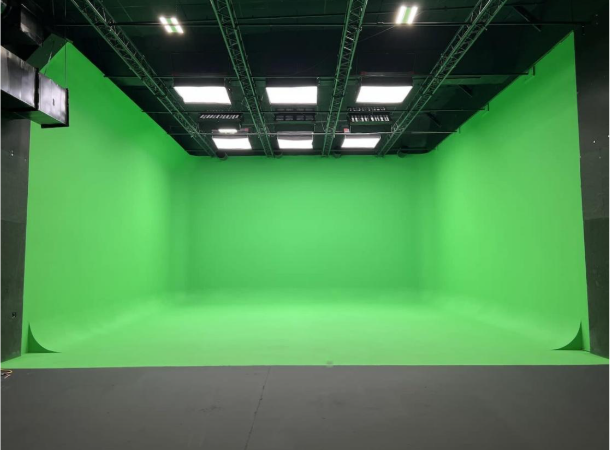
Perimeter Lighting
Even background illumination in a green screen studio or infinity cove is often achieved by lighting the cyclorama from its perimeter.
At Soundstage Studios, this is simplified by having a base layer of cyclorama lighting already in place.
A row of strip lights is positioned approximately one metre in front of the front edge of the cyclorama, facing the surface, producing a broad and even wash across the cyc.
An additional eight-foot strip of lights positioned vertically at the sides of the cyc can be introduced where required to contribute to this perimeter lighting.
In practice, this arrangement produces a stable starting point that crews can work from quickly while keeping the subject lighting independent.
Clients frequently comment on how even the cyc appears, and it rarely requires further adjustment before filming begins.
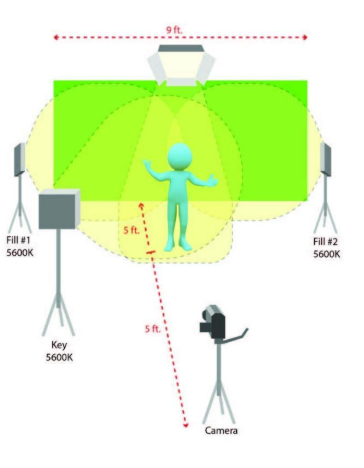
Separation Between Subject and Screen
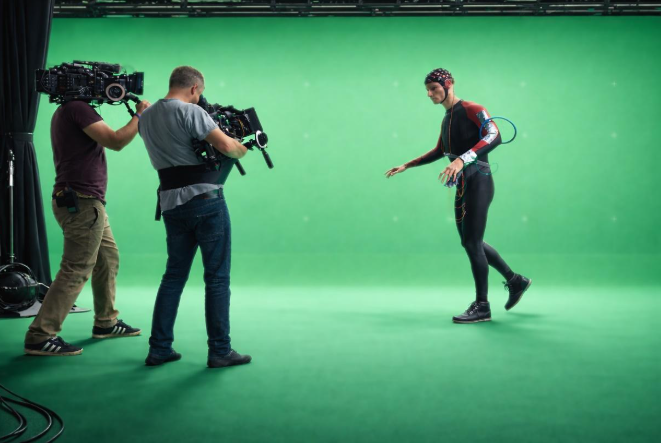
Even with perfect lighting, the distance between the subject and the screen remains important.
If the subject stands too close to the background, reflected green light can contaminate edges, and shadows may appear on the screen.
Placing the subject several feet forward allows the screen lighting to remain undisturbed, while backlights can be used to maintain separation.
Larger studio spaces make this arrangement much easier to achieve.
Focus and Depth of Field
Fine edges, such as hair or fabric, benefit from sharp focus because the compositor can define the boundary between subject and background more precisely. A reasonably broad depth of field, therefore, helps maintain clearly defined edges.
At the same time, the screen itself can benefit from being slightly out of focus. When the background sits some distance behind the subject small surface imperfections or minor lighting variations become softer through the natural fall off of depth of field.
These two conditions may appear contradictory, but greater physical separation between subject and screen makes them easier to achieve.
Backlight and Spill Control
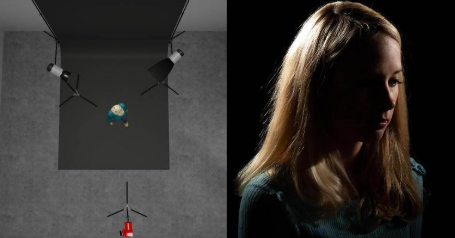
A controlled backlight or hair light can further improve separation between the subject and the background.
Positioned behind or slightly above the subject, this light produces a subtle highlight along the hair and shoulders, which helps define the edge of the subject.
Some productions introduce a slight minus green adjustment to this backlight. This produces a gentle magenta bias, which can help counteract green spill.
Chroma Subsampling and Key Quality
Recording format can also influence how easily a clean key can be extracted.
As video resolution increases, the amount of data required to store each frame grows rapidly. Even modest increases in image dimensions can result in a substantial rise in storage requirements. Various compression techniques therefore exist to reduce file sizes while preserving as much perceived image quality as possible.
One of the most widely used methods is chroma subsampling.
This approach relies on a characteristic of human vision. The eye tends to be more sensitive to changes in brightness than to subtle variations in colour. Video systems can therefore reduce colour resolution slightly while retaining full brightness detail with very little visible loss of quality.
In practice this means that luminance (brightness) information is retained for every pixel, while colour information is shared across small groups of neighbouring pixels.
This allows significant savings in storage and bandwidth while maintaining images that appear almost unchanged to the viewer.
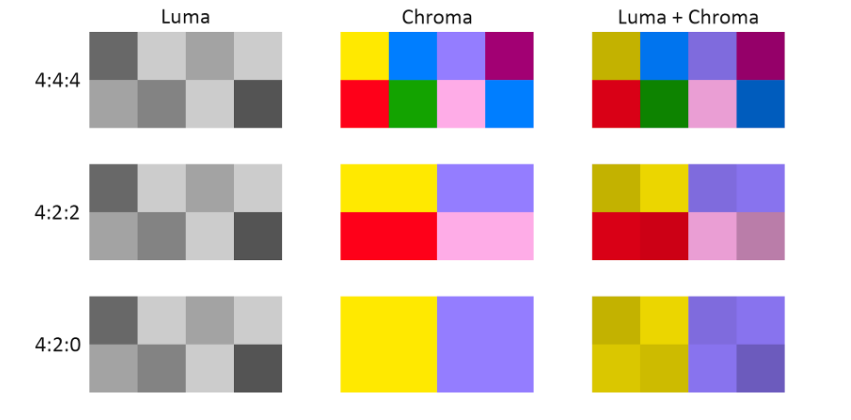
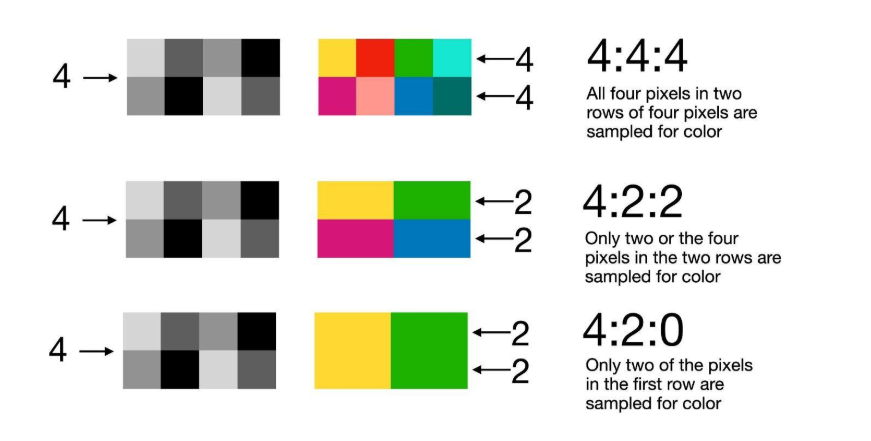
Chroma subsampling is commonly described using ratios such as 4:4:4, 4:2:2 and 4:2:0.
Many readers encounter these numbers in codec names such as ProRes 422 or ProRes 444 (more precisely ProRes 4444) without immediately knowing what they represent.
What the Numbers 4:4:4 Actually Mean
The three numbers used to describe chroma subsampling originate from an earlier digital video sampling system in which a small horizontal group of pixels is examined and the amount of colour information recorded for that group is described numerically.
The first number refers to the brightness samples recorded across that group. In most modern systems brightness information is recorded for every pixel, which is why this value normally remains 4.
The second and third numbers describe how many colour samples are recorded across the same region.
In a 4:4:4 format, colour information is preserved for every pixel. Both brightness and colour are sampled equally, so no colour detail is lost.
In 4:2:2, brightness is still recorded for every pixel, but colour information is shared between pairs of neighbouring pixels. In effect the colour of two adjacent pixels is averaged to a single intermediate value.
In 4:2:0, colour information is reduced further. Groups of four pixels share colour information, so the colour resolution is effectively quartered while brightness resolution remains unchanged.
Although this reduction may sound dramatic, the visual impact is often surprisingly small because the human eye is far more sensitive to brightness detail than to subtle colour differences.
For most forms of video production, this trade-off produces a very efficient balance between image quality and storage requirements.
For chromakey work, however, colour precision becomes more important because the key depends on isolating very specific colour values. Formats with higher colour sampling, such as 4:2:2 or 4:4:4, therefore tend to produce cleaner edges around fine detail such as hair or fabric.
Practical Takeaways
When preparing a chromakey shoot a few principles tend to make the greatest difference:
Even lighting matters more than bright lighting
Distance improves separation
Solve problems during capture rather than correction
Careful lighting and exposure during filming usually saves significant time and complexity in post-production.